In my blog post the 13th this month (the Blog Hop Post) I promised you to show you how I did the Sew Sweet book, so promises is promises. Here it comes:
I started with a ordinary manilla file folder, cut it to size 14 cm x 14 cm and made a hole in the midle with my craft knife.
Then I took some silk paper/tissue paper and tore it into small pieces and crumpled them together. (This will be the book cover)
With Modge Podge I glued piece by piece on the front and the back of my litle file folder book and let it to dry aprox 2 hour or so.
When this was dry I paintet the cover and the back with white gesso just to archive a nice and white surface. Let it dry.
Then I get over the front and the back with Mod Podge again very carefully in between all kinds of places. This in order to achieve the right color and texture in the next step.
And the next step is to smear the front cover with Distress Ink, and set it aside to dry, approx two days.
Meanwhile I start with the design paper I will use inside the book.
I used Distress Oxide in colour green, pink, yellow, purple, blue and grey on a watercolour paper using the Distress ink tool
Some water splatters
Some stencils, using the same colours as in the background
And then stamps, a lot of stamps. This is the Rubber Dance Sew Sweet stamp set. This stamp set is so beautiful.
Now my desgn paper is finish and I can cut it into the right sizes for my book. The leftover paper I used inside the book for pockets etc, and some tags.
When the ink was almost dry, after two days, I smear, using my fingers, the front and the back cover very gentle with Inka Gold and Metallic Paint on the top of the "bumps"
I stamped the button stamp on white cardstock and glued it on a transparent paper. Then I glued file folder together so that it was only one opening left and I got a side pocket and a top pocket.
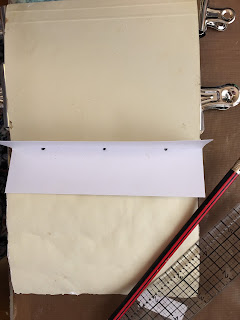
I made a template of white cardstock to create holes where I was sewing in my signature (signature is all the pages together).
I glued the design paper on the inside of the cover and at the inside of the back cover
Then it was time to sew the signature into the book. First I used a awl
I used the three stitch binding on this book.
And here is the book page by page:
I also did some sewing in the book.
There is plenty of room for both writing and drawing one own patterns. Maybe some stamping as well.
I used an elastic band in pink and gold and threaded a pink button for the closure. And on the end of the sewing tread I threaded some colorful pearls.
I hope you liked my step by step. Maybe it was to long? Hope not.
If you want to buy the stamp set I've using in this book or/and other stamps from Rubber Dance please remember to use code AS-FreeShip for free shipping worldwide.
Don't forget to join the Rubber Dance Blog Hop! You have until tomorrow to participate in the fun. To join just click here and start hopping and commenting.
I will soon come back With more creativities and fun. Stay tuned!
I do also hope that you want to follow me on my blog, if you not doing already ♥ Just press the Follow button on the right hand side bar and you're in :-)
Hugs, Anita
♥


I love this book! It is gogeous. Nice to see the inside!!!
ReplyDelete